Showing posts with label Before and After. Show all posts

Thursday, May 19, 2011

Before, After & After - Redo of Music Dresser

Hi Y'All - It's me again! 

Our next project was a redo of the dresser that Jennifer and I decoupaged with sheet music to enter in the Miss Mustard Seed's Copy Me Challenge.  To read about our MMS Copy Me Challenge, Click Here

Unfortunately, no one wanted to buy her all gussied up in her music outfit, so a change was on our to-do list.

Poor little thing was stripped of her music - every last note was removed.  Let me just say for the record, that stripping Modge Podge is almost like stripping the marshmallow creme mixture used to make Rick Krispie treats. What a mess - sticky, gooey and yucky!  The process didn't really take long though.  And I think it will be worth it in the end.

This dresser was purchased on Craig's List and she came to us like this.

Before
 Here is how she looked for the Copy Me Challenge.  We did place in the top 5 and that was exciting!

1st After
Here she is all stripped and ready for her new colors and finishes.  For some strange reason, the top looks white.  However, it is wood, just like the drawers.  Must be the sunshine pouring in the garage.  These mid 70 temperatures are wonderful!  The top and drawers were sanded, but only because the wood had been subjected to chemicals and I wanted to make certain that the surfaces were smooth and ready for the paint. 


This little dresser is pretty straightforward.  Not a lot of curves - just those great ones on the top.  I want to run my hand along the edge every time I pass by.

The top was stained with MinWax Dark Walnut Wood Finish.  Two coats were applied to make the wood rich and dark.  The stain was left on for a bit, but wiped off before it became tacky.  After the top cured, it was waxed with Annie's dark wax and buffed to a soft shine.
MinWax Dark Walnut
The body of the dresser was painted with Annie Sloan's Chalk Paint in Old White.

It's here, I promise!  Old White - Annie Sloan

 The dresser drawers were painted with Louis Blue. 

Annie's Louis Blue
The last step was to apply Annie's clear wax to the remaining parts of the dresser - the drawers and the body and then polish them for as long as my arms last.

Here's the final shot!  We think she's ready for her close up and we hope that someone wants to take her home.

Edit:
Oopsie - I haven't added the final shot yet!  Sorry!  Cindy, you were too quick for me!  I'll take it and post it in a bit.  I'd forgotten that I set this post to appear automatically.  I just love that feature - but I really should get my ducks in a row, eh?  =)

p

Edit!
Here are the after after photos!

This photo taken with flash, but color is most true.
Dragged dresser into room with light.  But color looks much darker.  Strange!

Had trouble with sticking drawers and asked Miss Mustard Seed for advice. 
She said that she only paints the drawer fronts!  Works for me!


 What kind of knobs would you choose?
The before dresser had wooden ones.  Too boring, I think.
The music dresser had glass knobs.  Too predictable, I think.

What do YOU think?

Wednesday, May 18, 2011

Before & After - French Coffee Table

Hi Y'all - it's Paula!

This set of B & A's is of a French Coffee Table. Jennifer and I purchased this table and several more items at an estate sale.  This project was completed before we got our Chalk Paint, but it's still gorgeous. The subtlety of the gray is something that I'm learning to like more and more.  The table was painted with Behr's Manhattan Mist and then topped off with a coat of MinWax. The before photos have escaped me. Just imagine a Maple-e color coffee table.


The curvy legs and sides just make me want to smile!  So pretty. 

Love these streaks of dark on the top. 
My carpet isn't really brown, but oddly enough, the coffee table color looks true. It's a gray with a hint of blue, not much, just a tad.

The table was waxed- with dark Minwax for furniture and buffed with my own little arms.  Is there such a thing as a furniture buffer?  I'm gonna check on that one!

Coming up next - a French Desk makeover!


Tuesday, May 10, 2011

Kitchen Before & After

Hi Y'all - this is Paula!

Hope that all of you had a great Mother's Day.  We were in Arkansas for the weekend and we enjoyed seeing our family. 

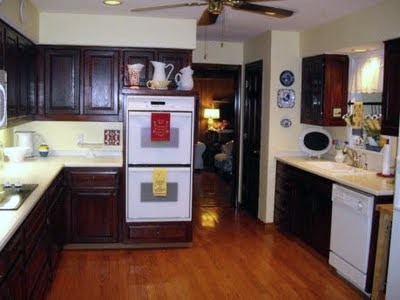
Here is a before photo of our kitchen.  The walls are yellow - not a good representation of the color in this photo, but for me yellow is difficult to photograph.  The counter tops are Corian and the cabinets are cherry.  The only back splash on the left side of the photo was a patch of green tiles that were behind the cook top.  The rest of the area was covered with wall paper when we moved in and we couldn't wait to rip it off!  Trying to decide what to put with white counter tops was difficult so I just ignored the green tile and let the rest slide.  Sometimes making decisions is difficult for me!  I think I'm always afraid of making a huge mistake!  The kitchen was on our list to redo and rework but then we decided to put our house on the market. 


Below is a photo after the new back splash has been attached.  We love the change it has made in the kitchen.  Will prospective buyers like it?  Well, so far we've had no offers since it was put in, but hopefully the right person will come along and love it too! 


The walls were painted Light French Gray by Behr, the same as the dining room.  We love the color and everything is clean!  =)
 
Click Here for the blog about the back splash.  Here are the ugly green tiles that we looked at for eight long years...why I didn't remove them earlier, I will never know.

Another photo of the new "tin" back splash below.  The cabinets are not actually this dark.  You can tell that I tried to tweak the photos to show the true cabinet color, but could not make them lighter.  Sorry y'all.  Still learning here!


This afternoon we are picking up new Annie Sloan Chalk Paint colors!  We are so excited and can't wait to get out our brushes and begin a few new projects. 

Right now I'm headed to the garage to build (Hahahaha!) a stand to set my garden buckets on.  We don't have enough yard space that gets enough sun for planting a few vegetables.  I priced building a raised garden bed, buying galvanized watering troughs and other ways to have some large containers of dirt.  I finally found some large plastic tubs at Dollar General that were only $8 each.  If they sit directly on the patio, the pesky fire ants find their way to the dirt.  Today I'm going to "attempt" to build a platform for them to sit on.  This should be interesting!  If I don't injure myself in the process, I'll show you some photos later!  =)

What are you working on?  We'd love to see!


I'm not certain how the box appeared! Oh well...

Friday, April 22, 2011

Mistake #3 - Another Before & After with B & W Photos! I know, I know... but the project is good!

Hi Y'all - me again! 

Well, I did finally figure out how to put my little point and shoot Pentax back on color. That happened last night while taking a photo of the drop leaf table.  Just hoping that I don't push a button, without knowing what I did to alter the state of things.  I'm always doing that on my computer!  It's so annoying, especially when I cannot fix it.

My second before and after project is a shelf.  The neighbors trash provided me with a perfect base for a shelf that Jennifer and I can use to store our crafting, sewing & machine embroidery supplies.  This is the project where the power tools were whipped out to make my work easier!

Before Photo
This is what I dragged from the alley curb to the garage!  And it's my first alley find too!
The shelf was in great shape.  In my mind it belonged to the our previous neighbors.  That man had every tool imaginable and this looks like something he would have whipped together.  He and his sweet wife died within 18 months of each other.  Mr. Neighbor kept an eye on the neighborhood and knew what was going on.  That made me feel safe and secure when Rick was out of town and he was/is out of town a-lot.  We miss our Mister and Missus neighbors and it's fun for me to have something that belonged to them and that the Mister made.   

The two shelves were knocked off with a hammer.  Closet shelving from HD was measured and cut to go on all three shelves.  The shelving had been used to put between two sawhorses for painting things, so it was free too!  WhooHoo - not only my first alley find, but my first free project too.  Just realized that!  Makes the whole thing even better, if that's possible!

The top shelf was the easiest and most straightforward.  The boards that were already in place just had to be covered.  Easy to measure and cut.  The third shelf board had to be cut to go between the existing boards and not on top of them like the first.  A little more thinking for me here.  Math is not my strong suit!  The second shelf was the most difficult.  Talk about no math skills!  This shelf had a little cut-out at the back of the sides so that the shelf would go beside the 2x4 and then jut out to cover the remaining side boards.  Well, I messed up the first cut on the shelf.  For some strange reason which I cannot explain, I cut into the board three inches in, instead of just the width of the side of the 2x4.  But the second time I got a good fit.  Not perfect, but good.  I was so proud!

This is the second shelf.  You can almost see my cut-out on the shelf.  
"Aren't these B&W photos great?!?", she said with just a touch of sarcasm.
Here is the shelf with all three new shelves attached.
Not wanting to waste any of the wood, the yucky stuff on the two small shelves that were removed was scraped off.  The scraped off yucky side was faced toward the back and then attached to the back of the top two new shelves to keep stuff from falling or being knocked off.  The bottom shelf already had a back board, I'm guessing it was added to make the unit more sturdy.  Oh, BTW, I didn't use screws, I used finishing nails.  I haven't mastered the screw sinking yet.  So it was nails and a hammer for me.  I did have to make an effort to think about where I was putting in the nails so that I wouldn't miss a board completely.  Almost made that mistake.

Everything received a good sanding with my handy-dandy palm sander.  Then I applied a coat of my beloved Annie Sloan Louis Blue Chalk Paint, followed by a coat of dark Minwax and some buffing, then a coat of natural Minwax with more buffing.  I just love the feel of the wax on the wood - it's almost soft!  I was so stingy with the chalk paint that I would dip my brush in water after dipping it in the paint and it worked great!

Well, I can't take a color photo of the shelf from my bedroom.  That will happen tomorrow so you can really see the after.  I'm eventually going to get all of this figured out!

What's next? 
  1. The repainting of a French coffee table, from white to Light French Gray.  Yum!
  2. A redo of Noble's room - new arrangement, bedding, curtains and "theme".
  3. Art work for his room - Jennifer has some great ideas and we'll try to implement what she sees in her head! 
  4. Chest of drawers makeover.  One of the drawers was stuck in the chest.  One side was waaaay back.  It was greased good with WD40 and finally I could pull it out.  (It's the new muscles from using the power tools and the big trimmers for the rose bushes!)  Just one little downside - the drawer front came off.  The dovetails of the drawer were caught behind the front of the chest.  That's an easy fix and I've actually done that repair once on the buffet that we took to Round Top.  We're excited about all of our projects - so stay tuned!
  5. Give-A-Way - The Followers number hasn't changed in a few days, but we're ready for the give-a-way!  Maybe we'll get there next week!  Keep watching! 
Wishing all of you a Blessed Easter as we celebrate the Risen Lord! 
He is Risen!

Mistake #1, Your Imaginations, Mistake #2 & a House Showing

Hi Y'all - I'm baaack - It's Paula!

Well, I've been so excited to show you my projects!  I just couldn't wait for you to see that I have been using an electric saw and sander and painting with the Annie Sloan Louis Blue Chalk Paint.

MISTAKE #1

Apparently, when a person uses their Pentax SR and sees only black & white through the view finder, the photos turn out to be black and white too!  So, all of my photos are black & white.  Ugh, Grrrrr, and all of those nasty (Noble says, "Natny"!) things ya just wanna say!  My words aren't "swear" words - they are crud, and shoot and stuff like that, which is bad enough.  And Noble is picking up on all of those, so I must stop my brain from sending those words to my mouth!

YOUR IMAGINATIONS

OK.  So indulge me here and let's play "Pretend".  OK?  OK.  Hoping that you remember how.  Pretend that these before photos are in color.  And pretend that you can see that the drop leaf table is red with a stained wooden top - which I did 7 years ago, by the way!  Who knew I was ahead of the curve?!?   I will take new after photos tomorrow, I am just too tired to do it now.  Wait!  I might be able to photograph the drop leaf table from where I am, which is propped up in bed typing to y'all!  LOL!  I'll try it and see what happens!  =)

MISTAKE #2

This mistake was a big one - but who knew? Here is the drop leaf table. Pretend time! Remember that the bottom part is deep cherry red with a stained top.


Oh Yikes!  Not only is this  B&W, which is insulting enough, but my shadow is in the corner.  Ugh. Drat...
The original plan was to put the chalk paint directly over the red.  I'm so glad that I didn't.  You'll see why in a bit.  Instead, I decided to spray paint with Heirloom White and then put the chalk paint over that so that I could distress it a bit and have some white showing through.  After using 3.5 cans of paint, there was little bubble on the side of the table.  I reached down to rub it away, thinking it was the white, but no!  It was the red.  The paint was peeling - in huge sheets.  Just peeling right off of that table.  A good cry came to mind, but instead, I found my handy dandy scraper and began scraping it all off...  And that brings us to pretend photo #2.

Yes sirree, all of big dark blobs are red paint with a nice coat of Heirloom White!

More blobs of paint, but she's coming pretty clean.  Sanding is next!
After sanding, getting ready for a hose bath.  I know - but it was the best way.
This little project was only supposed to take me about 30 minutes and then I was movin' on to something else.  Well, this "little" project turned out to be a huge three day project - and it's not over yet!  The top is no longer my favorite feature like it was before all of this began.  It should have been stripped.  My instincts told me, but I ignored myself and the stain went on unevenly.  Next week, I'll bite the bullet and strip and re-stain the tops of the leaves. 


See how uneven the top is?  Shoulda known better.  Trying to skip a step never, ever works!


I can take a  photo from the bed!  Hahahahaha!  Here is the drop leaf table.  The colors aren't quite true.  But I'll do a "real after" tomorrow in the daylight.  The table was waxed twice - once with Minwax dark and the second with Minwax natural and buffed between waxes.  I love the chalk blue and how the dark wax got into the nicks and crannies of the layers of paint.  Can't wait for you to see that.  There is no way that I wanted to strip the whole thing, I wanted the unevenness to be there on the bottom part.  This table had/has about 5 different colors on it.  Amazing!  I am learning a lot about re-doing furniture.  The more you do, the more you learn. 


HOUSE SHOWING TODAY

Jennifer and I worked so hard to prepare for this showing.  Cleaned the garage.  Trimmed roses on the East side of the house.  We cleared the West side yesterday and it was a jungle of tangled, growing, overtaking rose bushes, I tell you!  Mowed and "blew" the front yard and sidewalks.  Cleaned the inside - you know, all of those things we should do regularly, say we are going to, but don't. 

We have three skylights in our home and one is in the master bath.  The finish on the wall part was peeling and looked awful.  I decided that we'd paint it.  Jennifer scraped away all of the peely pieces.  I'm so silly.  It never dawned on me that I'd have to do something about the missing finish.  Out to the garage to find the drywall compound.  There is a brush that has been flattened that was used to put the finish on most of our walls - it's a 1980's thing in Texas I guess, since I've never seen it anywhere else.  Well, I didn't have the brush - it's in Little Rock is storage!  (Isn't everything?!?)  So I mixed up the compound, put it in a paper plate, climbed up on the ladder and used my fingers and patted them all over the wall space in the skylight.  We put a box fan on top of the ladder flat on it's back to dry the compound and then painted it with ceiling paint!  Good as new!  Why we hadn't done that a year ago, I don't know. 

Don't know if the lookers liked our home.  But the house is clean, the ceiling is fixed and tomorrow is a new day! 

Y'all be good and let me know what you've been working on!  I'm certain that your photos were NOT in black & white!  =)  Who knew there was an app for that? 

Monday, February 28, 2011

Before & After

I have 2 new blogs I want to share. 
Some of you may already know about them,
but I wanted to share some of their DIY projects. 
Looking at their before & afters have made me look at furniture differently. 
It also taught me what to look for while searching CL.

**Photos below are by Holly & Sean from Life In The Fun Lane**

**Check out her Country Cabinet, I love how she placed those books - - with the pages facing out**


Holly's headboard before


After


I now know to look for scroll legs, scalloped bottom, & sweet detail on the drawers.


Harp Chair


I love how Holly made this Sheet Music skirt for this dresser. 
Click Here for a tutorial on how to make it.

My favorite is this China Cabinet.

This China cabinet has scroll legs, scalloped bottom, & sweet detailing.

The next new favorite blog to read is Stories Of A House

I am definitely looking for this dresser! I love the color blue she used in this.


Dresser Before


Dresser After

(When you go to her blog, you can see wonderful details of this beautiful dresser)

After reading these 2 blogs, I went out & found a dresser with details.  I can't wait to show it.
I've been begging to keep it & sell my dresser ... mom says no!
It's so hard because you find what you love, but you can't keep it. 
C'est La Vie!

P.S. Have  you ever wondered how Anthropologie creates those amazing window displays??  Get The Scoop Here

Jennifer Lynette

Friday, February 11, 2011

MMS & FJD's Copy Me Challenge

The Girls of Lulu's Designs are entering the Copy Me Challenge!
  
Copy Me Challenge

When Miss Mustard Seed & Funky Junk Donna posted the Copy Me Challenge,
we knew immediately which project we wanted to tackle.
Here is Miss Mustard Seed's Project.  Look at that color.  Look at those curves.  Look at that stuff!
The first thing on our list was to find a dresser to use. 
After searching for several days, this dresser was purchased from a Craig's List seller. 
Dresser with Squeaker-Bud cat sauntering by on the left!
Because of below freezing temps, we were forced to do our painting in the house. 
That meant no paint spraying from a can or a sprayer.  
We were sad because we love to use the paint sprayer! 
The dresser required a light sanding and then good wipe-down. 

Because the dresser had a coat of varnish or something like that that made it super shiny, we decided to use a primer.  We had a gallon of Kilz on hand, so we painted on two coats and let it dry overnight.

Time for paint! 
We wanted a contrast between the color of the aged sheet music, so we decided to use white paint from Behr.  For ages purchasing Floetrol has been on our to-get-list.  When we saw it on the shelf at Home Depot we couldn't wait to get it in our cart!  It was great.  The brush strokes after drying were minimal.  However, there were some dripping problems which meant sanding and repainting a few areas.  That was ok, it was a learning process.  Next time we'll know better how to control that. 
Good stuff!
Here is our version of the sheet music dresser all gussied up and ready for her close up! 
Isn't she gorgeous?
Couldn't you just eat her up?!? 

Look at that old music!  Can you see "Lucille" on the drawer right there? 
As close to Lulu's as we could get!  We love the different shades of the music.  All of those oldie colors show up just fine.  We wondered who touched this music before us.  Who played the piano and sang?  Who heard it and smiled?  Old things with such great history touch us and we fall in love.

We used glass drawer pulls that we had on hand. 
Clear on the top and bottom drawers and larger pink ones on the middle drawer.
More yummy shades of color on the top.  Mmmmm.
The music wreath is a special order that we made. 
Dyed coffee filters, some pink tulle and a lace flower top it off. 

And of course, what vignette for a MMS challenge would be complete without some German glass glitter letters?  These happen to spell "LOVE" just in time for Valentine's Day. 
After all, MMS is THE German glass glitter queen! 

We added a concrete yard angel.  She actually lives indoors though. 
Isn't she sweet?  She wanted bling and we provided it for her. 
Doesn't every MMS follower love bling?  I mean bling and simple just go together, don't they?

A little silver bowl filled with shredded sheet music and pastel eggs provide
a reminder of  Springtime to come and new beginnings.

We love the white ironstone pitcher with lavender and it smells yummy. Look at that handle.  Wow!
The starfish reminds us of time spent at the beach and warm sunny days playing
in the sand and listening to the waves crash on the shore.

In the little silver bowl is antique German lace and it was probably all handmade.
Just think of the hours that went into that. 
And we thought dealing with bubbles while doing decoupage was difficult!

Oh yes, we even copied MMS's shabby lampshade and little stack of books.  
We are shameless, aren't we?  =)
The photos on the lampshade are family.  
The photo of the young girl on the right of the lampshade is our grandma and great-grandma Ocie. 
 The photo on the left of the lampshade is our mom and mamoo. 
She looks a bit mischievous, doesn't she?  She probably was since she had eight brothers and sisters!She's now 81 and has dementia.  She's just a happy little girl in this photo!  We like that.


Hanging from the shabby lampshade is a vintage French Chateau key hung with pink seam binding.
 It's our bit of rust as a tribute to Funky Junk Donna.  We wanted to do rusty and enter with
you too Donna, but who knew that decoupage would take so stinking long? 
We love your style and tip our hats to you!
We adore the child's glass pink butter pat. Hmmm, can we sell it?

A beautiful Christening gown that we found on Etsy and picked up in a city near us to have it in time.
Yes, MMS, we went to great lengths to copy you and your style!

A close up of the pink German glass glitter letters.  Oh so shiny and beautiful.  They twinkle.  We likie!
 MMS has given us a new appreciate of all things beautiful. 
And all things are beautiful, even if they are worn and old and smell funny -
you know like mothballs, or old houses. 
That's what the sheet music smelled like. 
We learned to love that smell because it took us back in time while we were Modge-Podging.

When we finished photographing our vignette, we wondered why our home doesn't
look like this one little dresser with all of these things that we love. 
We think we are headed in a new direction! 
Thanks Miss Mustard Seed for showing us the way! 
It's been fun and we look forward to what's ahead! 

Now where's that paintbrush, paint, sandpaper and piece of
brown furniture that we've decided to redo?

Come on y'all, leave a comment.  Make our day!  Just say Hi!
Jennifer and Paula
The Girls of Lulu's Designs &